If you’re tired of scattered Notion pages and endless tweaks, it’s time to build - or adopt - a Life OS. A Life OS is more than a template; it’s a connected system of databases and dashboards that centralizes your tasks, goals, habits, and projects into one command center. Whether you’re managing daily routines or tracking long-term milestones, this guide shows you how to create a Life OS from scratch or leverage pre-built options like those from OS Dashboard HQ.
Here’s what you’ll learn:
- What makes a Life OS different from a simple Notion template
- How to set up core databases for tasks, projects, goals, habits, and life areas
- Tips for building Today, Weekly, and Life Overview dashboards
- Why pre-built dashboards from OS Dashboard HQ save time and effort
Let’s dive into the steps for building your system - or finding the perfect ready-made dashboard to simplify your workflow.
My Notion Life OS Beginner's Guide: How To Setup A Second Brain! # 1
sbb-itb-ced67d6
What a Life OS in Notion Actually Is
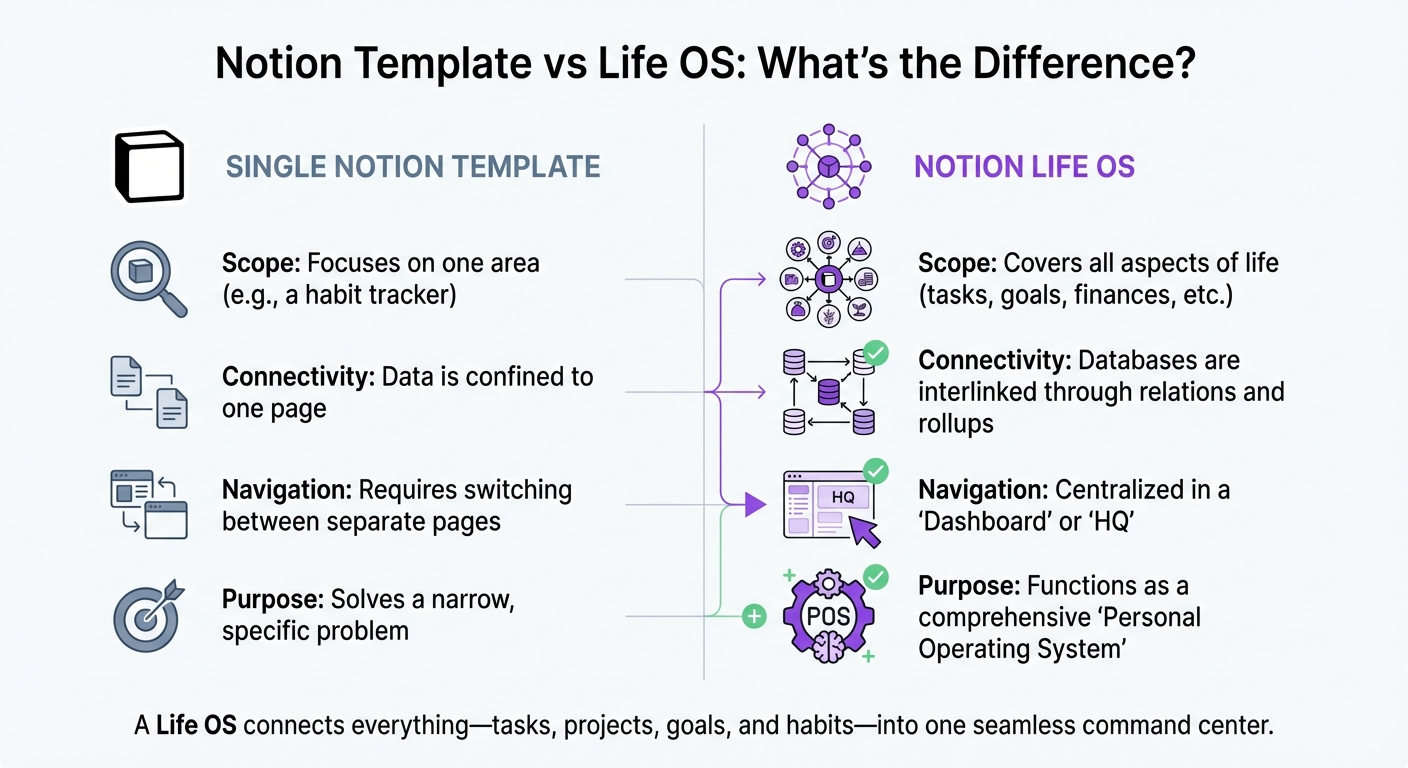
Notion Template vs Life OS: Key Differences Comparison
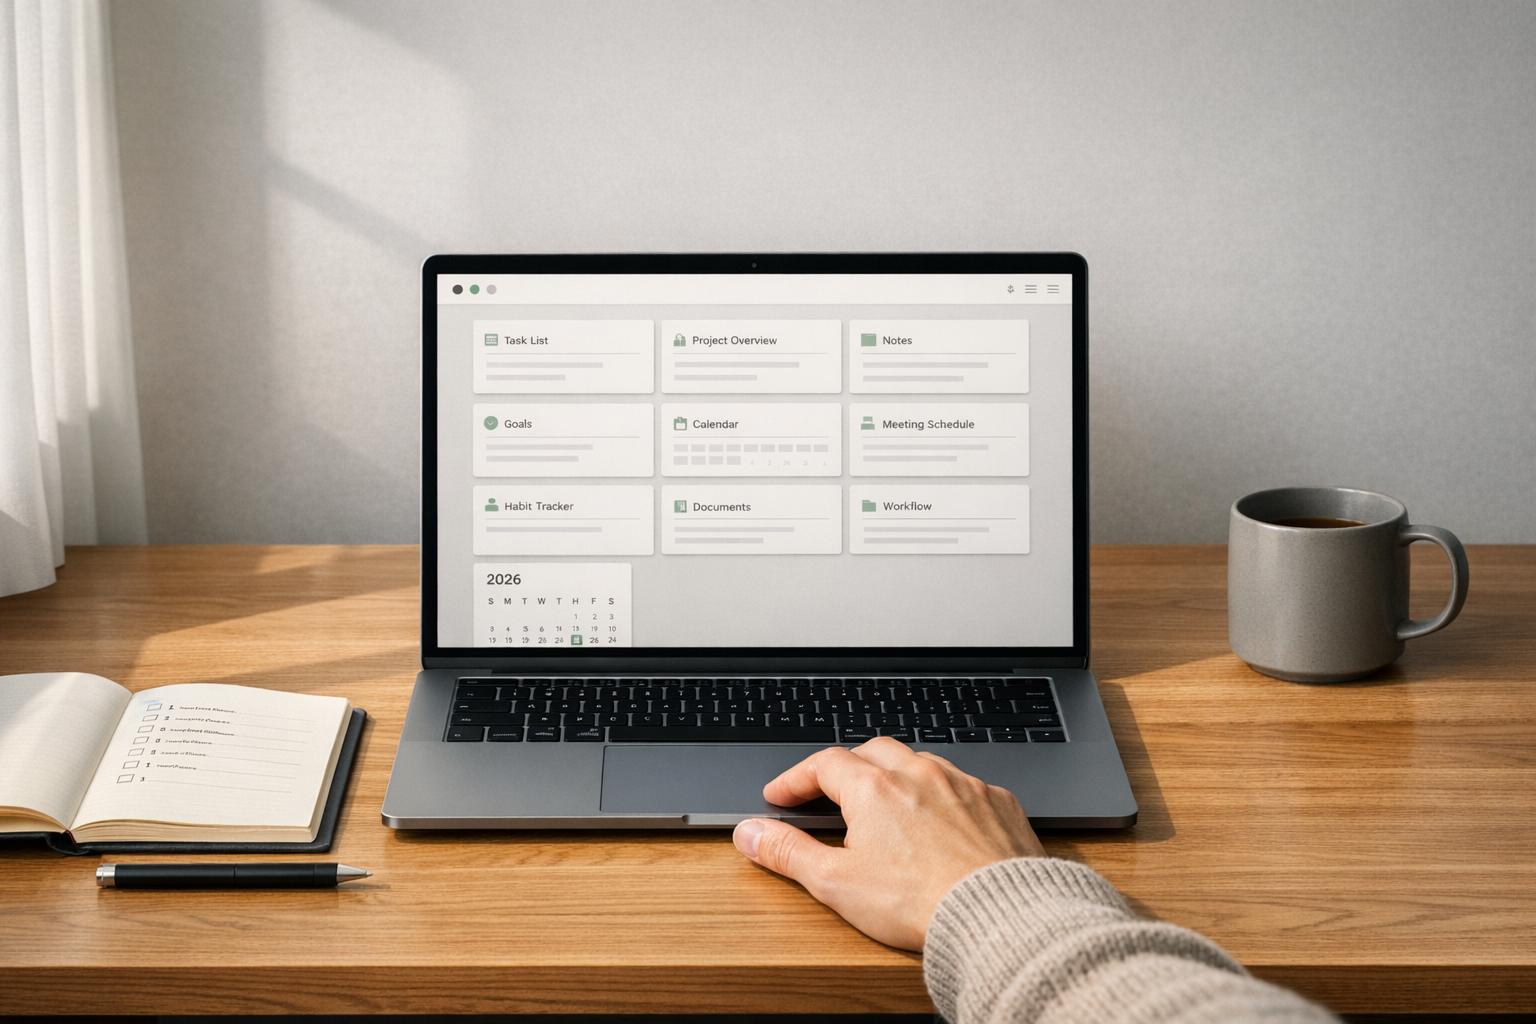
A Notion Life OS goes beyond simple to-do lists or individual pages. It’s an interconnected system of databases and dashboards that brings tasks, projects, habits, goals, and notes together in one seamless workspace. Picture it as your personal command center, where every detail - whether it’s a daily task or a long-term objective - links together using Notion’s built-in relations and rollups. This structure ensures everything stays connected, making it easier to manage and navigate your life.
Notion Operating Systems vs Templates
The distinction between a standalone template and a Notion operating system (OS) lies in their purpose and functionality. A standalone template is designed for a single task, like tracking habits or managing a reading list, and operates in isolation. In contrast, a Notion OS is a fully integrated ecosystem where databases communicate with each other. For instance, in a Life OS, completing a task might automatically update your progress on a quarterly goal because of the linked databases. This interconnected design eliminates repetitive data entry and manual updates across multiple pages.
Here’s a quick comparison:
| Feature | Single Notion Template | Notion Life OS |
|---|---|---|
| Scope | Focuses on one area (e.g., a habit tracker). | Covers all aspects of life (tasks, goals, finances, etc.). |
| Connectivity | Data is confined to one page. | Databases are interlinked through relations and rollups. |
| Navigation | Requires switching between separate pages. | Centralized in a "Dashboard" or "HQ." |
| Purpose | Solves a narrow, specific problem. | Functions as a comprehensive "Personal Operating System." |
Life OS as Your Personal HQ
This integrated approach transforms a Life OS into more than just a tool - it becomes your central hub for managing daily tasks and long-term goals. By consolidating everything into one workspace, it eliminates the need for multiple apps and reduces the frustration of juggling disconnected tools. Instead of jumping between various platforms, you can open a single Today Dashboard that highlights what’s most urgent and relevant at any given moment.
This "single source of truth" ensures that your data flows seamlessly across all linked views. As Julia Rodenburg explains:
Centralize information in related master databases; then filter and format that information within contextual dashboards.
Core Building Blocks of a Life OS
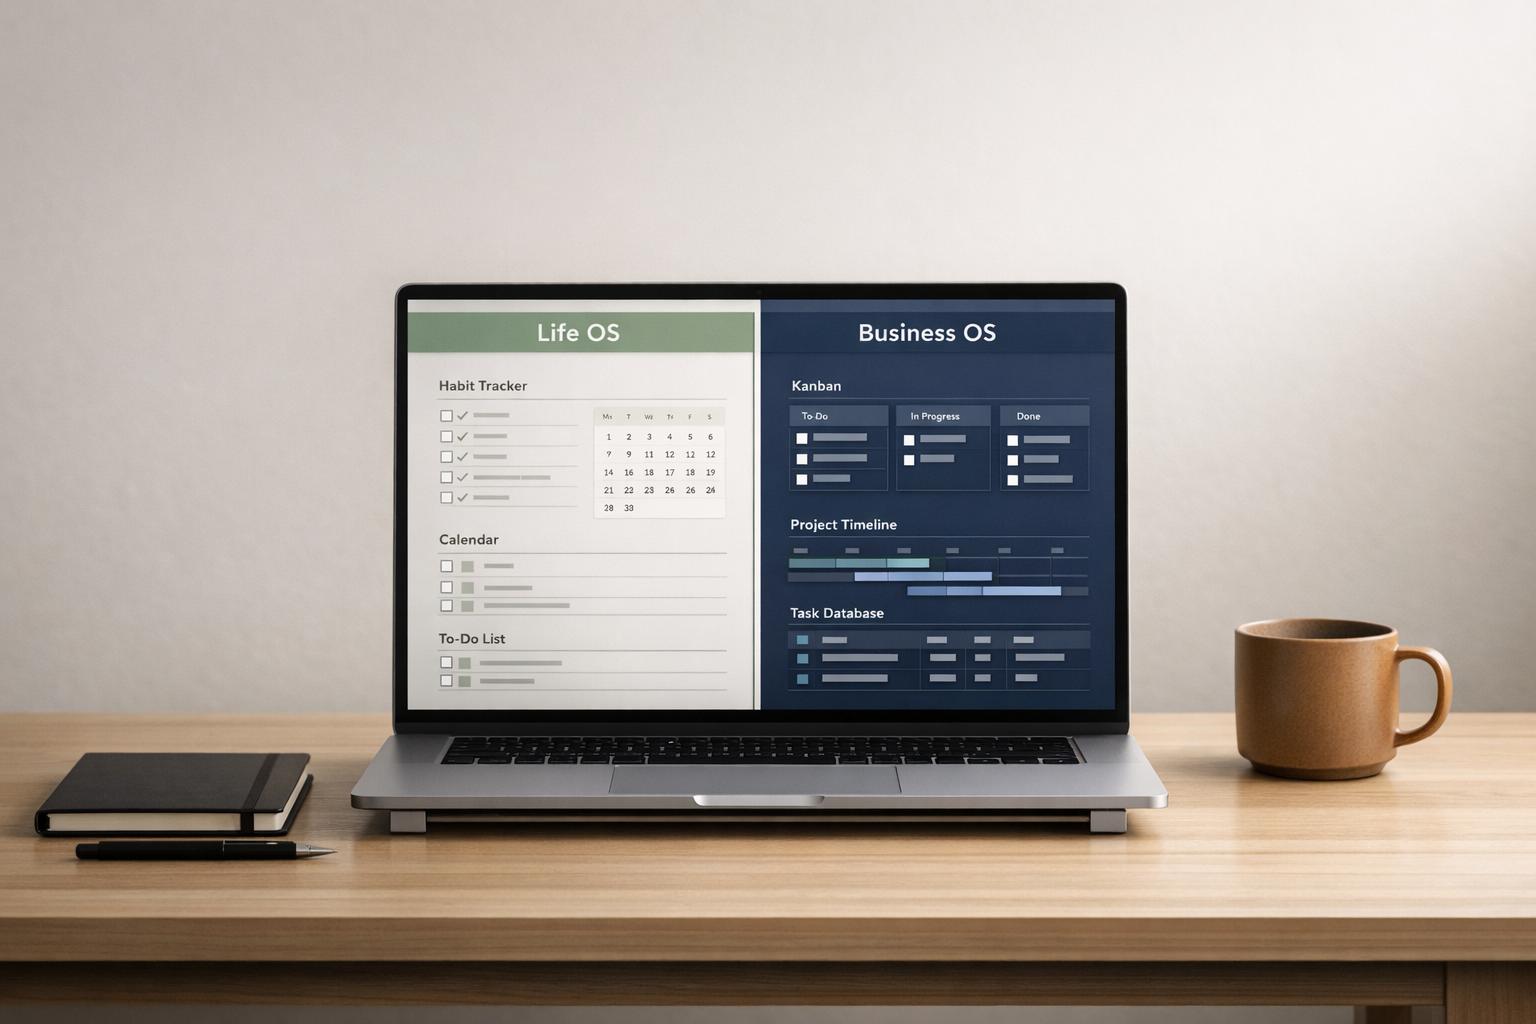
A Notion Life OS revolves around five interconnected databases that help manage various aspects of your life. The Tasks Database keeps track of daily to-dos. The Projects Database organizes these tasks into larger objectives with deadlines. The Goals Database focuses on long-term aspirations - whether they’re yearly, quarterly, or monthly - and ensures your daily efforts align with those ambitions. The Habits & Routines Database monitors recurring activities and consistency over time. Lastly, the Areas (Life Domains) Database groups everything into categories like Health, Finance, Work, or Personal Growth.
Key Databases for a Life OS
Each database has a specific role to play. Tasks handle individual actions, such as "Send invoice" or "Pick up dry cleaning." Projects group these tasks into broader outcomes like "Launch marketing campaign" or "Plan a wedding." Goals define larger achievements, such as "Lose 15 pounds" or "Save $5,000." Habits track daily routines like "Journal every morning" or "Exercise for 20 minutes." Areas act as a framework, categorizing everything so you can focus on what’s most important - whether that’s your family, career, or personal well-being.
Connecting these databases creates a system where every action ties into a bigger picture. For example, linking tasks to projects and projects to goals ensures that your daily work contributes to meaningful progress. As Suzaan Sayed, a productivity systems writer, notes:
Completeness is a trap. A 'complete' system sounds appealing... but completeness requires maintenance. Every database needs updating. Every property needs filling.
To avoid overwhelm, start small. Use just three foundational elements - Tasks, a Weekly Planning page, and a Reference Library - and expand as your needs grow.
Basic Properties for Each Database
The properties you assign to each database determine how effectively they integrate and function as a cohesive system. Here’s a breakdown of key properties:
- Tasks: Name (title), Status (To-do/Doing/Done), Due Date, Priority (High/Medium/Low), and a relation to Projects.
- Projects: Name (title), Status, Timeline (date range), a relation to Tasks, and a relation to Goals.
- Goals: Name (title), Life Area, Quarter/Year, Progress (formula), Status, and a relation to Tasks.
- Habits: Date, Habit Checkboxes, Progress Bar (formula), and Notes.
- Areas: Name (title), Icon (media), Related Projects, and Related Goals.
Roman Likhachev, the founder of Grizzly Templates, offers a helpful tip:
If you don't filter or sort by a property weekly, delete it.
Avoid overloading your setup with properties like energy levels or complex prioritization systems unless you plan to use them regularly. The aim is to reduce the effort spent on maintaining the system so you can focus on taking action. For tracking goal progress, a straightforward formula like (completed / target) * 100 works well. It generates a visual progress bar in Notion, which updates automatically as tasks are completed.
With these essential databases in place, you’re ready to move on to mapping your life areas and setting meaningful goals in Step 1.
Step 1: Map Your Life Areas and Goals
Identify Your Life Areas
Life areas are the major categories that define your ongoing responsibilities - think Health, Career, Finances, Relationships, and Personal Growth. Most people find that 5–7 core areas work best. To figure out yours, ask yourself: "What responsibilities or priorities regularly occupy my thoughts?". The things you think about most often are likely your key life areas.
When naming these areas, avoid vague labels like "Miscellaneous" or "Stuff." Clear, specific labels make it easier to organize your information without overthinking. Examples include Work & Career, Health & Wellness, and Finances. A helpful starting point is to map out everything you manage - whether it’s work, side projects, health goals, or family obligations. This process helps you create a system that aligns with how you naturally think about your responsibilities.
Once you’ve nailed down your core areas, the next step is to structure them within Areas and Goals databases.
Create and Link Areas and Goals Databases
Now that you’ve identified your life areas, it’s time to bring them into Notion. Start by setting up two databases:
- Areas: Include properties like Name, Icon, and Total Progress (calculated as a rollup).
- Goals: Add properties such as Name, Status (e.g., Not Started, In Progress, Completed), Deadline (date), Progress % (formula), and a Relation property to link it to the Areas database.
To connect these databases, add a Relation property to the Goals database and link it to the Areas database. Then, toggle the "Show on Areas" option to make the connection visible in both databases. This setup creates a clear hierarchy: Areas represent broad life categories, while Goals break these down into specific, measurable objectives.
For instance, if your Health & Wellness area includes goals like "Complete a 30-day yoga challenge" or "Lose 10 lbs by June 2026", you can track each goal’s progress within its respective area. Display your Goals database in a Gallery view on your main dashboard to keep these objectives front and center. You can also link goals to specific quarters (e.g., Q1 2026) to make them feel more achievable.
This structure sets the stage for integrating tasks, projects, and routines in the steps that follow.
Step 2: Build Tasks and Projects the Right Way
Set Up Tasks and Projects Databases
Once you've outlined your life areas and goals, it's time to create the databases that will guide your daily actions. Start with a Tasks database, ensuring it includes key properties like Status (e.g., Not Started, In Progress, Done), Date, and Priority (High, Medium, Low). Then, set up a Projects database with properties such as Timeline (a date range), Status, and a Progress Bar (created using a formula or rollup) to monitor multi-step initiatives. Roman Likhachev, the founder of Grizzly Templates, discovered that simplifying task properties from 12 to just 6 significantly boosted his task completion rate. Keeping things straightforward from the start can make a big difference.
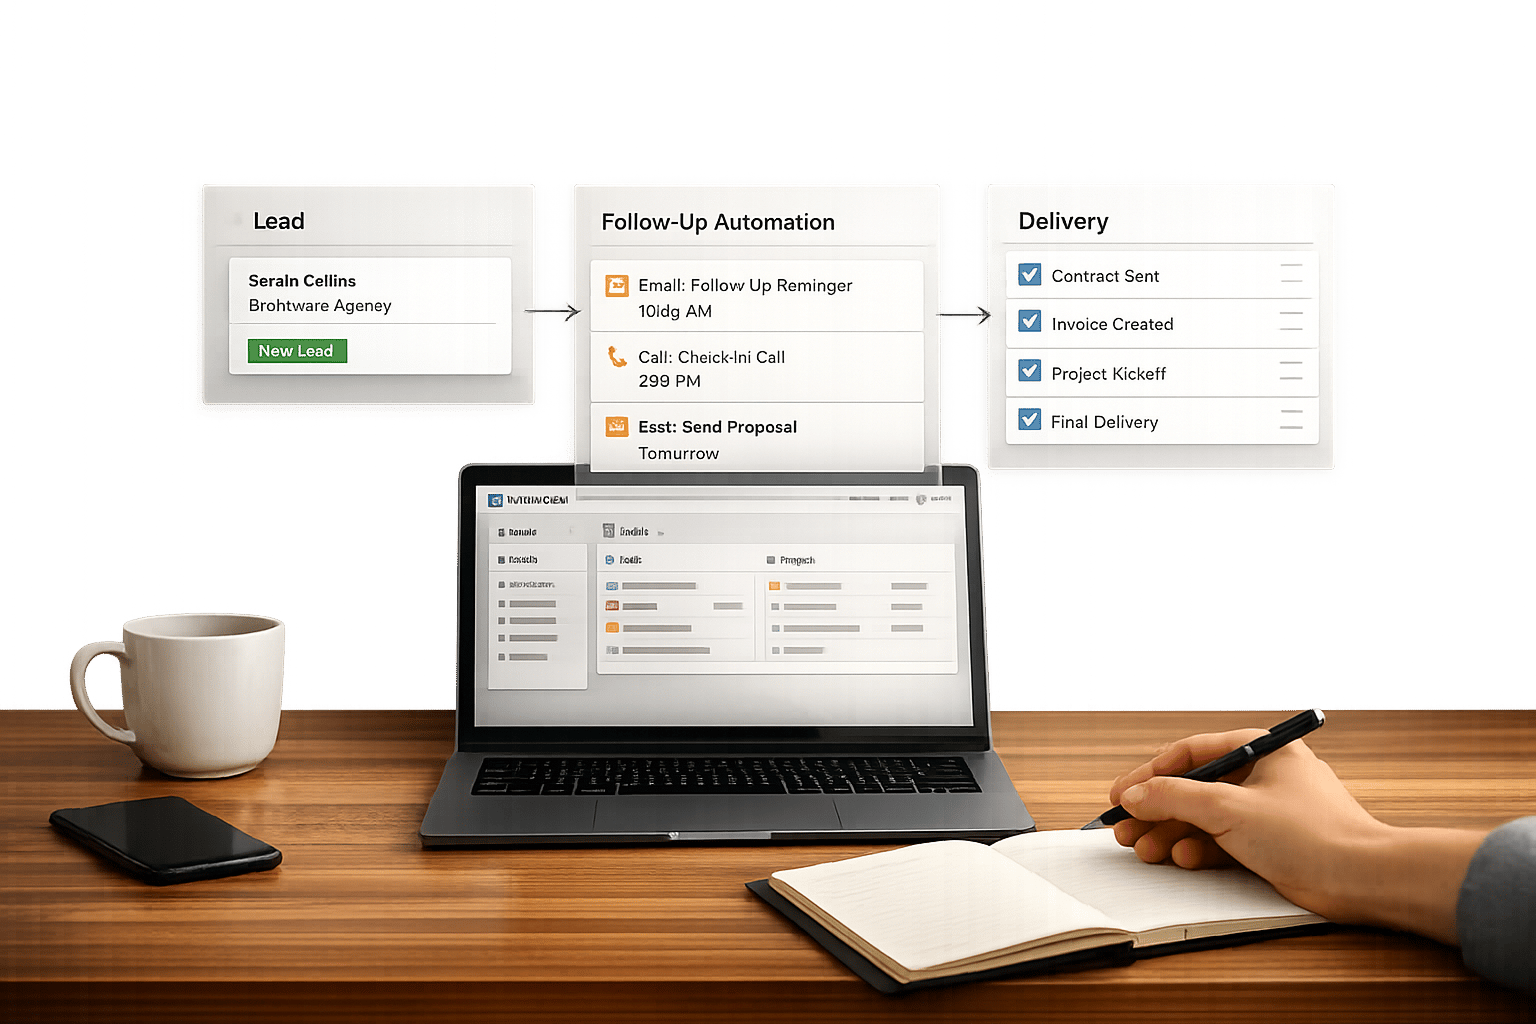
Link Tasks to Projects, Areas, and Goals
The real magic of a Life OS happens when you connect your databases. Use Relation properties to link your Tasks database to your Projects database. Then, connect Projects to your Areas and Goals databases. These links ensure that every task you complete contributes to your larger objectives. To take it further, add a Rollup property in the Projects database to calculate the percentage of completed tasks automatically. This creates a dynamic progress bar for each project, helping you see at a glance how close you are to completion. As Clarity Mastery aptly puts it:
Stop using Notion database like a spreadsheet and start using it as a connected system.
Create Simple Views for Task Management
To stay organized, filter your Tasks database into practical views. For example:
- A Today view that shows tasks due today or overdue, as long as their status isn't marked as Done.
- A Next 7 Days view for planning your week, showing tasks with upcoming deadlines.
- A Kanban Board grouped by Status to give you a visual overview of your workflow.
You can also create a Calendar view filtered to display tasks for the current month or week, making it easier to track deadlines. Placing the Today view at the center of your main dashboard transforms it into your primary action zone. Using Linked Database Views across different dashboard pages ensures you only see what matters most in the moment.
Here’s an example of how these views might look:
| View Type | Filter Description | Purpose |
|---|---|---|
| Today | Tasks due today or overdue, not marked Done | Focused daily execution |
| Next 7 Days | Date is within the next week | Short-term planning |
| Kanban Board | Grouped by Status or Priority | Visual workflow tracking |
| Calendar | Filtered by the current month or week | Deadline visualization |
With your tasks now linked to projects, areas, and goals, you’ve established a strong foundation. Next, you’ll expand your Life OS by incorporating habits and routines.
Step 3: Add Habits and Routines to Your Life OS
Set Up a Habits and Routines Database
Now that your tasks and projects are working together in your Life OS, it’s time to weave in the daily habits that keep everything on track. Start by creating a Habits database with a few key properties: a Checkbox for marking completion, a Date to log when the habit was completed, and a Frequency using a Select property (e.g., Daily, Weekly, or Monthly). To make things even more engaging, add a Formula property to display a progress bar that updates automatically as you check off habits. This turns your consistency into something you can actually see and measure.
Roman Likhachev, the mind behind Grizzly Templates, shared that his Life OS - which combines habit tracking with tasks and finances - only takes about 10 minutes of daily upkeep. As of February 2026, over 4,000 people have adopted his system. His advice? Keep it simple. Focus on 1–2 habits that have the biggest impact before adding more. Trying to track too many habits at once can lead to burnout and inconsistency. By syncing these routines with the rest of your system, your Life OS becomes a fully integrated tool for daily success.
Link Habits to Days or Life Areas
To get the most out of your habits, connect them to other parts of your Life OS. Use a Relation property to tie each habit to your Life Areas database (e.g., Health, Work, Learning). This helps you visualize which areas of your life are thriving and which might need more attention. For even greater alignment, link habits to specific Goals. For instance, a habit like "Read 30 mins" could connect to a goal such as "Read 24 books this year", giving your daily actions a clear sense of purpose.
On your main dashboard, create a Today view that filters habits to show only those with today’s date that haven’t been checked off yet. This keeps your focus sharp and avoids decision fatigue. Behavioral Systems Designer Dr. Lena Torres explains:
The best organizational systems don't just track data - they reveal patterns in behavior.
During your weekly review, adjust or remove habits that you’re consistently skipping. Once your habits are linked to key areas and goals, they’ll naturally flow into your Daily and Weekly Dashboards, making them an effortless part of your routine.
Step 4: Create Your Key Life OS Dashboards
Now it’s time to set up the three core dashboards that will act as the backbone of your Life OS: Today, Weekly Planning, and Life Overview. These dashboards are more than just pages - they’re your go-to hubs for managing daily priorities, planning your week, and staying aligned with your long-term goals. Instead of creating new databases, use linked views of your master databases (Tasks, Habits, Goals) and apply filters to focus on what’s relevant.
Today Dashboard
Your Today dashboard answers the question: "What should I focus on today?" It’s designed to minimize distractions and decision fatigue by presenting only the essential information you need for the day.
- Add a linked view of your Tasks database, filtered to show tasks with today’s date and a status other than “Done.”
- Include a view of your Habits database to track habits scheduled for today.
- For quick access, add a section for upcoming events or a timeline view of meetings and time-sensitive commitments.
By laying out your tasks, habits, and schedule in one place, your Today dashboard becomes a no-nonsense guide to getting things done. Once your day is organized, you can shift focus to your Weekly Planning dashboard to tackle upcoming deadlines.
Weekly Planning Dashboard
Your Weekly Planning dashboard balances short-term tasks with broader planning. It’s where you prepare for the week ahead and ensure nothing slips through the cracks.
- Set up a linked view of your Tasks database, filtered to show tasks due within the next seven days. A Calendar view works well here to visualize deadlines and prevent over-committing.
- Add another view to track active projects, using a Kanban board or gallery format to monitor progress and milestones.
- Include a Weekly Review Checklist with steps like clearing your inbox, updating goal progress, and planning the week ahead.
As Roman Likhachev explains:
"The weekly review is the single habit that keeps the entire system alive. Without it, everything slowly falls apart."
Spending just 30 minutes on a weekly review keeps your system running smoothly and ensures you stay proactive rather than reactive.
Life Overview Dashboard
The Life Overview dashboard gives you a big-picture view of your life, helping you align your daily actions and weekly plans with your long-term vision.
- Start with a Gallery View of your Goals database, filtered to show active or current-quarter goals. Use progress bars (via Notion formulas) to visualize how close you are to achieving them.
- Add navigation links or summary cards for your key life areas, such as Health, Finance, Work, and Personal Growth, so you can quickly dive into any area.
- If you track finances, include a snapshot of your monthly income, expenses, and savings progress.
A three-column layout often works well here:
- Left column for navigation links.
- Middle column for actionable items.
- Right column for widgets like clocks or event reminders.
Dashboard Overview Table
| Dashboard | Primary Focus | Key Database Views |
|---|---|---|
| Today | Immediate Action | Filtered Tasks (Today), Daily Habits, Quick Inbox |
| Weekly | Momentum & Review | Calendar (Next 7 Days), Active Projects, Review Checklist |
| Life Overview | Vision & Alignment | Goal Gallery (Progress Bars), Life Areas, Finance Summary |
For a pre-built solution, check out curated options like the Life OS Dashboard for Everyday Systems or the Ultimate Life Productivity Planner. These dashboards come with these three core setups already connected and ready to use. Explore more at OS Dashboard HQ to find a system that fits your needs. Once your dashboards are up and running, take time to test and refine them to keep your Life OS flexible and effective.
Step 5: Test, Review, and Adjust Your Life OS
Creating your Life OS is just the start - the real magic happens when you test it regularly and fine-tune it over time. Think of your Life OS as a dynamic system that evolves with you, not a static template set in stone. Without routine check-ins, even the most well-thought-out setup can become bogged down with outdated tasks and irrelevant details. The key is to keep your system streamlined, actionable, and aligned with your current priorities, ensuring it works for you, not the other way around.
Run Weekly Reviews
Dedicate 30 minutes each week - Sunday works for many people, but pick a day that suits you - to reflect and reset. Use this time to clear your inbox, update progress on goals, and plan out the week ahead. Review your Events section for any upcoming meetings, appointments, or family commitments. As Roman Likhachev, Founder of Grizzly Templates, aptly says:
The weekly review is the big investment, but it's also the most valuable 30 minutes of my week. Without it, everything slowly falls apart.
This habit ensures you stay on top of your commitments and maintain focus on your long-term objectives.
In addition to weekly reviews, consider layering in daily, monthly, and quarterly reviews. A quick daily check-in keeps your tasks relevant, while monthly and quarterly reviews let you evaluate trends in your Life Tracker (like mood, energy, or sleep), archive finished projects, and set new goals. These routines help you adapt your system to your evolving needs.
Adjust Views and Filters
Instead of overhauling your Life OS when something feels off, tweak your views and filters. Notion’s linked database views allow you to display the same data in different ways, so you can simplify without starting from scratch. For instance, if your Tasks database feels overwhelming, create a filtered view like "This Week's Priorities" to focus only on tasks due in the next seven days that aren’t marked as "Done". Follow the 10-second rule: if you can’t find the key information in a dashboard view within 10 seconds, it’s time to simplify.
During your weekly review, ask yourself: “What information am I not consistently tracking?” and “Which areas are creating unnecessary stress?”. If you’re not using a specific database property - like a "Priority" field you never filter by - consider removing it. Many users find that reducing task database properties from 12 to 6 can dramatically improve task completion rates by cutting down on decision fatigue. Keep your workspace focused by applying filters to hide completed tasks and habits, ensuring your dashboard remains clean and actionable.
For a head start, check out pre-built systems like the Life OS Habit Dashboard or the Dream Life Planner on OS Dashboard HQ. These systems come with optimized views and workflows, saving you time and effort.
When to Use a Pre-Built Life OS Dashboard Instead
Creating a Life OS from scratch can be a rewarding learning experience, but it’s often a major time sink. If you’re caught up tweaking databases instead of knocking out tasks - essentially stuck in setup mode - a pre-built dashboard can help you hit the ground running. These dashboards take care of the heavy lifting, offering the connected system that defines a Life OS without the painstaking setup. Research even shows that the average knowledge worker loses nearly 60% of their day on "work about work" instead of meaningful activities, making a ready-to-use system a game-changer for reclaiming your time.
Signs You Might Need a Pre-Built Dashboard
If your productivity is dragging because setup is taking over, it’s worth considering a pre-built option. Here are a few telltale signs:
- Your Today dashboard is still incomplete after a week.
- Tasks, goals, and habits are scattered across multiple tools, and you’re craving a single Personal HQ.
- Notion’s features like relations and rollups feel overwhelming.
- You can’t get even a basic system functional within 30 minutes.
In these situations, a pre-built Life OS dashboard can save you from endless tinkering. Beyond just saving time, these dashboards offer frameworks that are already tested and ready to integrate into your workflow. For example, the Life OS Dashboard for Everyday Systems comes preloaded with 47 frameworks like Atomic Habits, Getting Things Done, and The 12 Week Year. Setting this up on your own could take weeks, but a pre-built dashboard lets you start using these systems immediately. Users report significant improvements - some boosting task execution rates from 40% to 85% after switching to a well-designed system.
As Alex Chen, a startup founder, put it:
I've tried every Notion template out there. This is the first one I've actually stuck with... The identity-first approach completely changed how I think about productivity.
What Makes OS Dashboard HQ's Life OS Dashboards Stand Out
The Life OS dashboards available on OS Dashboard HQ are designed to provide a comprehensive system right out of the box. They include interconnected databases for tasks, projects, goals, habits, and areas of focus, along with dedicated dashboards for Today, Weekly, and Life Overviews. These pre-configured setups save hours of manual work.
Dashboards like the All-in-One Life Planner and Ultimate Life Productivity Planner come packed with advanced features. These include AI tools that analyze your habits to offer actionable recommendations, automated metrics that update in real-time, and built-in systems for tracking habits and setting goals.
Most premium Life OS dashboards on the platform are available for a one-time payment of around $149. This price typically includes setup support, video tutorials, and access to exclusive communities. You can also enhance your system with specialized add-ons. For managing finances, options like the Expense Tracker for Personal Finance or Finance Tracker with Monthly Summaries are available. If you’re a student balancing academics with personal goals, the Student Planner and Study Hub is tailored to meet those needs. These curated tools let you skip the setup grind and focus on what matters most - getting things done.
Next Steps: Explore Life OS Dashboards on OS Dashboard HQ
If setting up your Life OS has felt like a daunting task - or you’re just looking for something more polished - head over to OS Dashboard HQ. It’s a curated hub of Notion operating systems, thoughtfully organized by audience and purpose, making it simple to find a dashboard tailored to your needs.
The Life OS dashboards category offers ready-to-use systems designed to keep everything connected. These dashboards integrate tasks with projects, link projects to broader goals, and include dedicated views like Today, Weekly, and Life Overview dashboards. For instance, the Life OS Habit Dashboard zeroes in on routines and identity-based habit tracking, while the Dream Life Planner helps align your daily actions with long-term goals. Want something visually appealing? The Aesthetic Life Hub Dashboard combines life planning with a sleek, design-forward approach that makes daily use feel effortless.
You can also expand your Life OS with additional tools. Add-ons like Personal Finance 101 help track finances, while the Student Planner with Course Trackers is perfect for academic workflows. If productivity systems are your focus, check out the Personal Productivity OS category for frameworks like the GTD Productivity Dashboard or the Ivy Lee Six Tasks System, both built around time-tested methods.
Use the directory to filter dashboards by role or purpose, and preview each option with detailed screenshots of layouts like Today and Weekly dashboards. Whether you’re refining your own setup or adopting a pre-built system, these resources make it easier to create a workspace that works for you - so you can spend less time tweaking and more time getting things done.
FAQs
Do I need all five databases to start a Notion Life OS?
No, you don’t need to set up all five databases right away. Start with the essentials: tasks, projects, and goals. These three are more than enough to organize and manage your life effectively. Once you’re comfortable, you can gradually introduce additional databases, like habits or finances, as your needs grow. Keeping things simple at the beginning makes it easier to build a system that works for you without feeling overwhelming.
How do relations and rollups reduce manual updating?
Relations and rollups in Notion make it easier to keep everything connected and up to date. Relations link items across databases - like tying tasks to specific projects - so any updates in one spot are instantly reflected wherever they’re connected. Rollups, on the other hand, pull in and summarize data from those links. For example, they can count how many tasks are completed or total up your expenses automatically. Together, these features ensure your updates flow seamlessly across databases, keeping your Life OS running smoothly without extra manual work.
When should I use a pre-built Life OS dashboard from OS Dashboard HQ?
If you're looking to save time and skip the hassle of starting from scratch, a pre-built Life OS dashboard from OS Dashboard HQ could be the perfect solution. These dashboards come with a ready-made structure that connects tasks, projects, goals, and routines, giving you an all-in-one productivity system with minimal effort. They're a great choice if you value efficiency and want to spend more time managing your life rather than designing the tools to do it.