If your Notion workspace feels like a maze of scattered pages, it’s time to rethink how you manage documentation. A Notion operating system (OS) can centralize your team’s workflows, turning disconnected pages into a single source of truth. This article explores how to embed wikis, SOPs, and checklists directly into your Notion OS dashboards, making team documentation accessible, up-to-date, and linked to your daily operations.
Here’s what you’ll learn:
- Why team documentation belongs inside your Notion OS
- How to create a central Wiki or SOP database
- Ways to link documentation to projects, clients, and teams
- Tips for keeping docs up to date without extra work
Let’s dive into how a Notion OS dashboard can transform your team’s documentation process.
Notion Basics: Building a team workspace
sbb-itb-ced67d6
Core Wiki and SOP Structures for Teams in Notion
At the heart of effective team documentation lies a central Wiki or SOP database. This serves as the go-to source for all how-tos, checklists, and policies, organized with clear ownership and structure. By linking this documentation to relevant projects, clients, and teams, you ensure that SOPs are seamlessly integrated into the workflows where tasks and projects are managed.
Building a Central Wiki or SOP Database
To get started, set up a wiki database using Notion’s “Turn into Wiki” feature. This tool includes a Verification property that sets review deadlines and alerts owners when updates are due. Gabe, the founder of LearnChangeDo, highlights its value:
Page verification allows you to set a specific period for users to consider the SOP 'verified.' This means that if I'm a team member looking for a reference document, as long as it says 'Verified until [date],' I can rest assured that it can be followed.
For clarity and accountability, include key properties like Owner (Person), Tags (Multi-select), Last Edited (Date), and Status (Select). Set review cycles based on the type of content: high-stakes SOPs, such as compliance procedures or client onboarding, should be reviewed every 3–6 months, while evergreen content like company values can use the "Infinite" verification setting.
To maintain consistency, use database templates for creating new SOPs. Templates should include pre-filled sections like "Purpose", "Step-by-Step Instructions", and "Resources" to guide contributors and eliminate the need to start from scratch. This approach ensures uniformity, making it easier to scan and cross-reference documents across your wiki.
Once your SOP database is structured, the next step is to link it to your projects and teams for seamless integration.
Linking Documentation to Projects, Clients, and Teams
After standardizing your documentation, connect it to your Notion OS by linking it with related databases like Projects, Tasks, and Clients. Add relation properties to your SOP database, enabling you to tie specific SOPs to relevant tasks or projects. For instance, when assigning a task, include the relevant SOP so team members can easily reference it and complete their work accurately.
To make documentation accessible, embed filtered views of the master wiki database into team or department dashboards. For example, a "Marketing Hub" might display only SOPs tagged with "Marketing", while a "Client Onboarding" project page shows all onboarding-related SOPs. Additionally, use synced blocks to mirror essential documentation across different dashboards. Any updates made to the central SOP will automatically reflect wherever the synced block appears.
This level of integration ensures that your team’s documentation isn’t just a static resource - it actively supports daily operations within Business and Agency OS dashboards.
How to Make Documentation Easy to Find from OS Dashboards
For team documentation in Notion to work, it has to be accessible right when and where it's needed. If your documentation is buried in sidebars or hard to locate, team members are likely to skip it and ask someone instead. The fix? Bring documentation into the Business OS dashboards and Agency OS dashboards your team already uses - so the right information shows up exactly when it's required.
Creating Filtered Views for Specific Content
One way to make documentation more accessible is by adding linked views of your master Wiki database to specific dashboards, tailored to show only the content that matters in that context. For instance, a Client Portal and CRM dashboard can include a "Docs for this client" section by filtering the Wiki database to display only items tagged with that client. Similarly, a Marketing Hub could showcase only SOPs tagged "Marketing." This approach ensures team members see the most relevant information without needing to sift through unrelated material.
To ensure reliability, filter these views by the Verification property so only "Verified" content appears. As Notion’s Help Center notes:
When team members see the 'Verified' property filled out, this will inspire trust... they'll know the content has been checked and won't need to ask around to make sure.
Another helpful addition is a "Pages I own" view on individual dashboards. By filtering the Page Owner property to "Me", team members can quickly locate and manage the documentation they’re responsible for.
By combining these tailored views, you can make documentation easily accessible while keeping it relevant and trustworthy.
Embedding Documentation in Daily Workflow Dashboards
Embedding documentation directly into daily workflows saves time and reduces friction. One effective method is linking your Wiki database to your Tasks database, so each task can include its related SOP. Gabe from LearnChangeDo highlights the value of this approach:
When you create a task for a team member, you can also link the corresponding SOP directly to that task. When the assignees see the task, they can easily reference the SOP document.
This setup ensures that team members have the instructions they need right alongside their tasks, eliminating the need to search for guidance.
For information that needs to stay consistent across multiple dashboards, use Synced Blocks. Unlike static links, synced blocks update in real-time wherever they appear. This is particularly useful for things like emergency contacts or quick links, where changes need to propagate instantly. Templates like the Small Business OS Template Kit and Headquarters Toolkit often use this technique to maintain consistency across all levels of an OS.
Keeping Docs Up to Date Without Overload
Even the most thorough documentation can lose its value if it’s outdated. Keeping everything current requires clear ownership, practical verification methods, standardized templates, and simple review cycles that fit seamlessly into your team’s workflow.
Assigning Ownership and Using Verification
Assigning a specific owner to each document ensures accountability. In Notion, the Owner property designates the person responsible for maintaining the accuracy of SOPs and guides. Pair this with the Verification property, which allows owners to mark a document as "Verified" until a set date. Once that date passes, Notion automatically notifies the owner to review the document. This system ensures that only the assigned owner, who is most familiar with the content, can verify its accuracy.
Gabe, the founder of LearnChangeDo, highlights the importance of this approach:
The page owner property allows you to assign this person who will 'own' the procedure, ensure the SOP stays accurate and up-to-date, and potentially be the person to ensure the SOP is adhered to.
To make ownership actionable, create a "Pages I Own" view in your dashboard. This view filters the Wiki database to show only the documents where the Owner property matches the current user, giving each team member a clear list of their responsibilities. Managers can also set up a "To Review" view, which highlights all documents with expired verification dates, offering a snapshot of documentation health.
This system of ownership and verification sets the stage for consistent updates, making it easier to integrate standardized templates.
Using Templates for Repeatable SOP Formats
Once ownership is clear, templates ensure every SOP follows a consistent format. Instead of starting from scratch, set up database templates in your Wiki with pre-filled sections like "Purpose", "Steps", "Tools Required", and "Owner". These templates make drafting new SOPs faster while ensuring that reviewers always know where to find key details.
Templates can also include default properties, such as Owner and Status, to establish accountability from the start. Many Business OS dashboards and Agency OS dashboards already include adaptable SOP templates, offering a head start for teams looking to streamline their processes.
Setting Simple Review Schedules
With ownership and templates in place, simple review schedules keep the system running smoothly. Tailor review cycles to your business’s pace of change. For static content like mission statements, mark them as "infinitely verified" to avoid unnecessary notifications. For process guides tied to evolving workflows or tools, a six-month review cycle works well to catch updates without overwhelming the team.
Encourage team members to flag outdated content using in-line comments. These comments can be addressed during task-linked reviews, creating a feedback loop where owners receive precise, actionable suggestions instead of having to search for outdated sections themselves.
Examples: How Business and Agency OS Dashboards Handle Documentation
Business OS Dashboards with Integrated Wiki Layers
Business OS dashboards streamline documentation by centralizing it in a Company Wiki, serving as the go-to resource for essential information. These dashboards transform static pages into database-driven wikis with properties like Owner, Verification, and Tags, making it easier to manage and search for critical content like mission statements, HR policies, and brand guidelines. Tools like the Small Business OS Template Kit and Productive CEO Operating System exemplify this approach. They feature a "Company Hub" for top-level policies and department-specific views that pull relevant content from a shared SOP database.
What sets these systems apart is their ability to connect documentation directly to operations. For example, the Headquarters Toolkit links SOPs to task records, allowing managers to attach instructions right to specific tasks. This ensures that documentation isn't just stored but appears exactly when and where it's needed. Similarly, many Business OS dashboards integrate documentation into workflows like "Requests" or "Intake", so team members can automatically access related SOPs when submitting a request. Agency OS dashboards, however, take a slightly different approach by tailoring documentation to individual client projects.
Agency OS Dashboards with Project-Linked SOPs
Agency OS dashboards prioritize documentation that’s tied directly to specific projects or clients. Instead of a broad Company Wiki, these systems link SOPs, checklists, and other resources directly to client or project records, ensuring that relevant information is always accessible in the right context. For example, the Freelance Business OS System and Ecommerce Business OS Workspace include a "Docs" database that connects with "Projects" and "Clients" through relation properties. This setup allows team members to quickly locate onboarding checklists, brand assets, or delivery instructions for the client or project they’re working on.
When an account manager opens a client record, they see a filtered view of all relevant documentation - no need to dig through a master wiki. Some Agency OS dashboards even turn client portals into focused wikis, offering curated access to project-related materials for external clients. Additionally, by capturing lessons learned during project close-outs, these systems ensure that every client engagement contributes to improving future workflows.
Next Steps: Add a Wiki Layer to Your Existing Notion OS Dashboard
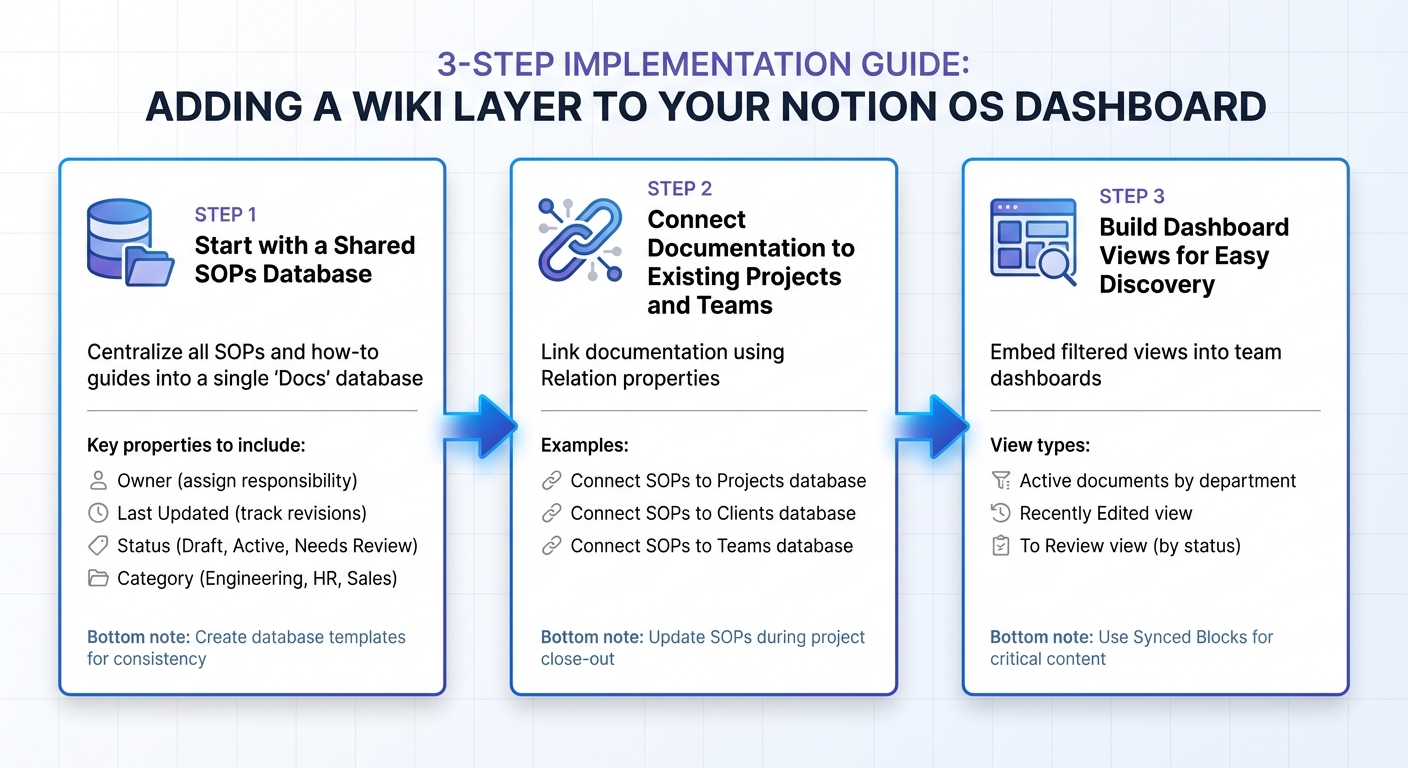
How to Build a Notion OS Documentation System: 3-Step Implementation Guide
Now that you've got the fundamentals in place, it's time to take your Notion OS to the next level by seamlessly integrating your documentation. Here's how you can do it.
Start with a Shared SOPs Database
The first step is to centralize all your standard operating procedures (SOPs) and how-to guides into a single "Docs" database. You can use Notion's built-in "Docs" template or premium Notion templates as a starting point, then customize it with properties to track each document's status and lifecycle. Key properties to include are:
- Owner: Assign responsibility to a specific person.
- Last Updated: Keep track of when the document was last revised.
- Status: Use options like "Draft", "Active", or "Needs Review."
- Category: Organize by topics such as Engineering, HR, or Sales.
To keep things consistent, create database templates for commonly used document types, like client onboarding checklists, project close-out reports, or SOPs. This ensures uniformity across all your documentation. As Notioners puts it:
In a single source of truth context, the goal is to have each component of your system stored only once and then fetched in any other location as referral and not as a duplicate to ensure consistency, accuracy and avoid duplication of information.
With this setup, your documentation becomes organized, accountable, and easy to maintain.
Connect Documentation to Existing Projects and Teams
Once your centralized database is up and running, it's time to link it to your existing "Projects", "Clients", or "Teams" databases using Relation properties. For example, you can add a "Related Project" relation to ensure that a "Client Onboarding SOP" automatically appears within the client's record. This way, when an account manager accesses a client page, all relevant documentation is right there.
To keep your wiki up to date, make it a habit to update related SOPs during project close-out. Before marking a project as "Done", review and revise any linked documentation. This practice not only keeps your knowledge base current but also turns every completed project into a chance to refine your processes.
Build Dashboard Views for Easy Discovery
Once your documentation is centralized and connected, the next step is to make it easy to find. Embed filtered views of your SOPs database into team dashboards. For instance:
- Show only "Active" documents relevant to that department.
- Add a "Recently Edited" view so team members can quickly spot updates.
- Include a "To Review" view filtered by status to keep track of documents needing attention.
To make critical content even more accessible, use Synced Blocks. For example, you can mirror navigation menus or key process checklists across multiple dashboards. With synced blocks, any update made in one location will instantly appear everywhere it's used. This approach ensures your documentation remains visible, up-to-date, and easy to access, turning your Notion OS into a dynamic knowledge hub.
FAQs
What’s the minimum setup for team documentation in a Notion OS?
A basic setup starts with a centralized documentation database - think of it as your go-to hub for key processes, guidelines, and reference materials. This could be a wiki or an SOPs database. To keep things organized, include properties like title, owner, last updated, and category.
For seamless integration, link your documentation to relevant projects or areas within your Business or Agency OS. Ensure everything stays accurate by using clear naming conventions, assigning ownership, updating the "Last updated" property, and setting up straightforward review schedules.
How do I link SOPs to projects, clients, and tasks without duplicating pages?
To link your SOPs with projects, clients, or tasks in Notion while avoiding duplicate pages, relational database properties are your best tool. These properties allow you to dynamically connect your SOPs to the relevant items, maintaining a single source of truth.
Here’s how to set it up: add relation properties in your SOP database to link it with your Projects, Clients, or Tasks databases. Once connected, you can embed filtered views of the SOP database on specific dashboards or pages. This way, you’ll only see the relevant documents where they’re needed most.
How can we keep docs ‘verified’ and updated without constant reminders?
To ensure your documentation stays accurate and current without requiring constant nudges, assign specific owners to each document. Make sure to include a “Last updated” property to easily track when changes were made. Set up a regular review schedule - whether quarterly or biannually - and tie it to recurring tasks for the assigned owners. Additionally, using standardized templates for SOPs simplifies updates and keeps everything consistent. This method promotes accountability and keeps your documentation relevant with less hassle.